Expect at least 4 hours,
perhaps longer for cleaning and painting parts. It is fairly
easy to replace a lower seal on a Burman steering box. The
steering box does not need to come out of the car.
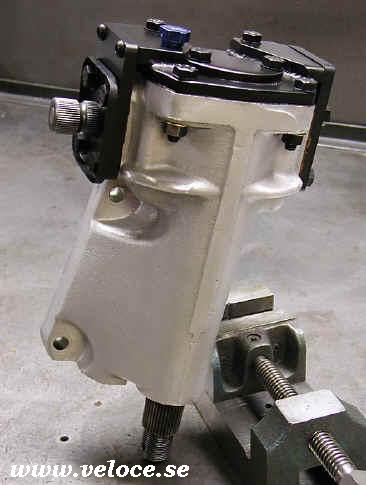
The Burman steering box is stunningly
simple, very robust, and has very few moving parts. Before
starting, read this entire procedure and understand it,
including the nomenclature of parts. Reference you repair
manuals for exploded diagrams or this link.
Burman steering box
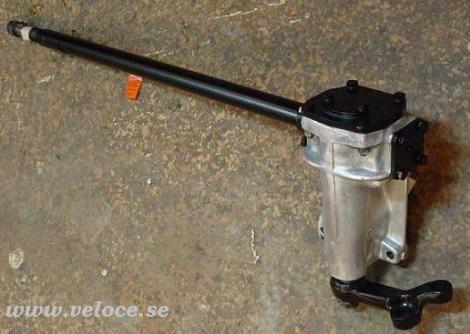
Below, a steering box for the US
market. They have a different column but the box has the same
construction as the other Burmans.
Parts required:
1.Oil seal. Just about any commonly available 28mm ID x 40mm
OD x 7mm height seal will work. For sale here
www.highwoodalfa.com
Special tools required:
1.32mm socket for removing the lower bolt from the rocker
shaft. If you don't have a 32mm, a 1¼" socket works just
as well and is within a quarter millimeter of 32mm.
2.Sturdy breaker bar, preferably at least 1/2" drive with
extension.
1.A strong 2-arm gear puller
3.Torque wrench
Removing the box from the car, which should
be on supports of course. Remove the battery, battery box and
rad. overflow bottle
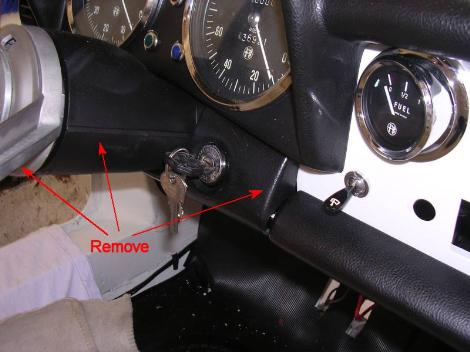
Under the dash:
2.Remove the plastic cover under the dash
3.remove the 2 bolts holding the column under the dash
4.remove the steering wheel (you'll need a puller)
5.Remove the bolt and wires holding the ignition
"sleeve" thing (mark the wires) also need to turn
the key to unlock the ignition then pull it back and off the
column
6.Remove the cover around the column against the firewall.
This was all under the dash
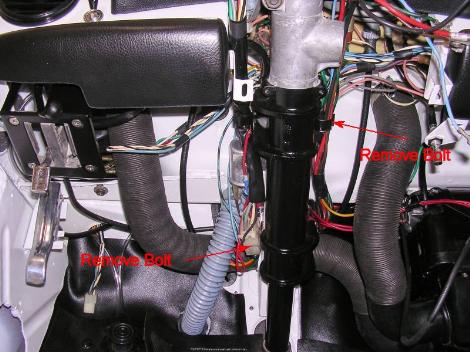
7.Remove the 2 tie rods from pitman arm
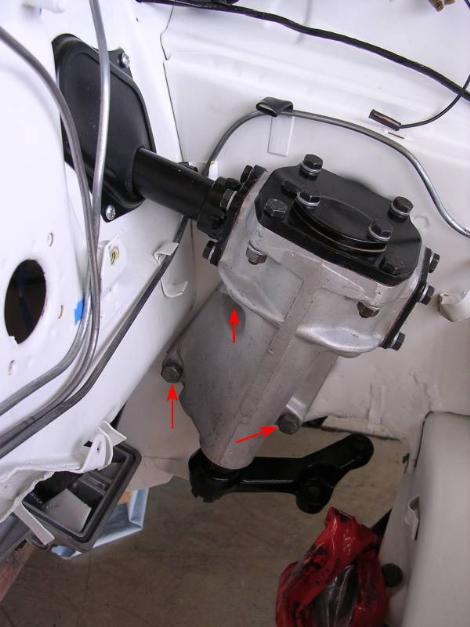
8.Remove the 3 big bolts holding the box to the body
Photos by OssodiSeppia and www.duettoinfo.com Brian
has an utterly clean Duetto.
Here is a drawing too, click
to enlarge:
Removing and dismantling:
1.The night before you do the work, I would recommend that you
put some high quality penetrating oil on the upper part of the
steering drop arm and rocker shaft. It is likely that these
parts are corroded together somewhat and will be difficult to
separate.
2.Put car securely up on jack stands. You will be exerting
considerable force getting the rocker shaft nut loose and again
torqueing it to specification, so the car need to be rock
stable.
3.Recommend removing the exhaust down pipes and front resonator
for more working room.
4.Center the wheels.
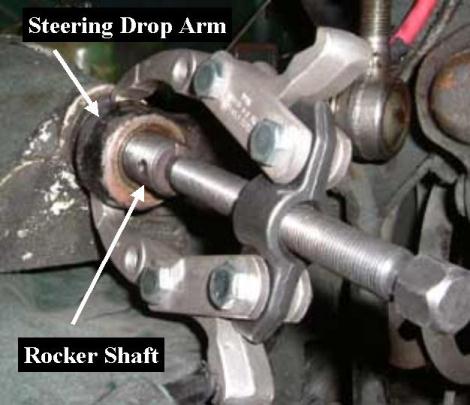
5.Mark steering drop arm to index it with the rocker shaft.
You want to reinstall the drop arm in the same relative
position to the shaft.
6.Remove cotter pin
7.Use the 32mm (1 1/4") socket and breaker bar to loosen
the rocker shaft bolt. Remove it completely and clean the
threads.
8.Loosely replace the bolt on the end of the shaft so that the
steering drop arm won't come flying off the shaft should it
pop under tension. This bolt is torqued to about 100 ft/lbs,
so it'll be fairly hard to turn. Lock the steering wheel so it
won't turn.
9.Use the 2 arm gear puller to extract the drop arm off the
rocker shaft splines. This will likely require considerable
force on the part of the puller. It must be of high quality.
.
11.If the drop arm won't budge, give the end of the puller
screw a sharp hit to break the corrosion. Be prepared for a
#pop#. If it still won't budge, put some more penetrating oil
on it and leave it under tension with the gear puller
overnight and try again in the morning.
12.Remove the bolt and extract the drop arm from the shaft.
There is no need to disconnect the tie rod ends from the
steering drop arm.
13.You may have to turn the wheels slightly to the right to
have the end of the drop arm clear the left suspension. This
isn't a problem because you've already marked the shaft and
drop arm to their relative positions.
14.Take hold of the shaft and see if you can feel any lateral
play (wear) in the bushing. If so, the box may need a new
bushing reamed. Replacing a seal in a shaft with worn bushings
will probably leak again.
15.If the steering box still has oil in it, place a bucket
under the steering box.
16.Working in the engine compartment now, remove the small
oval cover on the top of the steering box. This cover is under
slight tension from a short spring underneath. Remove the
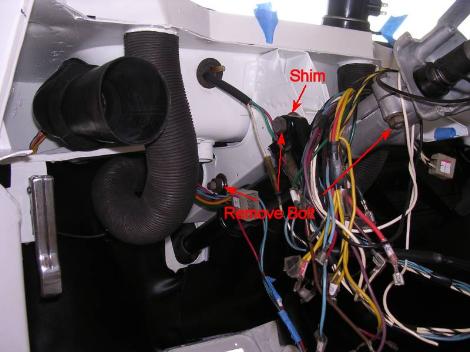
cover along with the shims underneath.
17.Remove the entire top plate of the steering box. The left
side bolts are in blind holes, and the right side bolts have
nuts and lock-washers underneath. The top cover isn't under
tension and will just lift off.
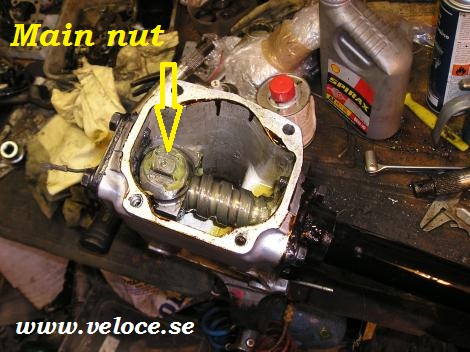
18.The inside of the steering box is now revealed. Note and
mark the position of the rocker shaft in the box. You will
want to return it to this position again for reinstalling the
drop arm later.
19.Next, turn the steering wheel so the rocker shaft is at the
FRONT of the box, i.e. with the wheels pointing fully to the
left.
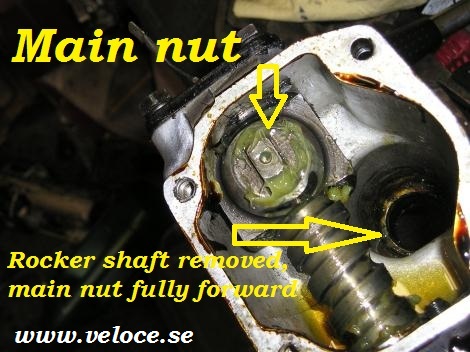
20.Pull up on the rocker shaft and remove from the steering
box. It may take a bit of twisting and slight rotation to
extract the shaft, but it will come out.
21.The main nut roller will likely be dislodged when you do
this so be prepared to capture it before it falls into the
lower part of the box. Stuffing some small rags or paper
towels will help capture it. If it does fall down into the
box, it should be easy to retrieve.
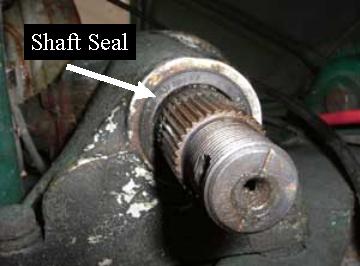
22.With the rocker shaft out of the box, get back underneath
the car and pry out the old oil seal. An ordinary screwdriver
or purpose built seal extractor both work well.
23.Clean out the cavity. Inspect the bronze bushing in the
steering box body for wear or damage. Ensure that the bottom
of the bushing is flush with the bottom of the boss. If not
carefully tap it back up into place.
24.Hopefully the steering box is clean inside. If not, it's
wise to clean it out while the lower seal is out. Inspect the
case casting for any cracks. I'll be easiest to see them from
inside the box. Look especially closely at the rear of the box
where the steering shaft enters.
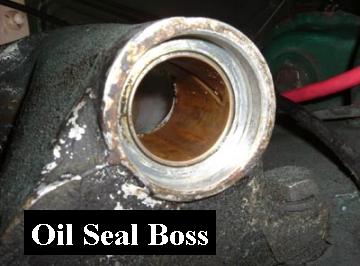
26.Install the new seal. Hand fit it
square into the boss, then squarely tap it into place. The
flat end of the 32mm socket works well. Just insert the
extension bar backwards in socket and tap the seal into place.
27.Clean and inspect the rocker shaft. There might me some
corrosion right around where the lower oil seal contacts the
shaft. Clean well and polish with a little metal polish so the
surface is as smooth as practical.
28.If it's badly corroded, you may get a leak even with a new
seal. A good machine shop can likely fix a corroded shaft
either with machining or installing a sleeve. If this is the
case, you might need to get another seal with a different
inside diameter size.
Reassembly:
1.Grease the rocker shaft in the area where it contacts the
bushing and lower seal lip. Carefully lower the shaft back
into the box body. Line up the steering nut and hole in the
upper shaft arm. Grease and replace the main nut roller in the
hole in the upper shaft arm.
2.Turn the steering wheel back to line up the rocker shaft to
the original index marks you made in the top of the box. This
will put the steering box back in the same position as when
you removed the drop arm below.
3.Replace the top cover. Cut a new gasket if necessary. Torque
bolts to 16.6 to 18 ft/lbs.
4.Replace the small oval cover along with the shims and the
short spring. To start the bolts, you may have to push down on
the cover slightly. This is the key to the play.
5.The spring (D on the photo below) should press down the
shaft (C on the photo below) so that there is no play at all.
The shaft pressure effects the round "cup" #6 (A on
the photo below) on the drawing here. The shims are #8 (E on
the photo below). The parts A and C are somewhat conical and
the springs takes the play. Here's a photo.

6.Refill the steering box with a little 90w GL-5 gear oil and
check for leaks at the bottom. If no leaks, refill the box.
7.Replace the filler plug. If your filler plug is missing, get
one. Any local auto store should have one that can be made to
fit. Do not leave it open or the steering box will become
contaminated with dirt and moisture.
8.Back underneath the car, replace the drop arm being careful
to line up your previously made index marks. Using some
anti-seize compound will make it easier to remove, if
necessary, in the future. Reinstall the large castellated nut.
9.Before torqueing, place a chunk of wood between the drop arm
and the left steering stop. This will take the torque of the
tightening process instead of transferring it to the steering
mechanism. Torque to 90.4 101.2 ft/lbs.
10.At the same time, line up the holes for the cotter pin. It
is necessary to use a new cotter pin unless the old one is in
excellent condition. As all steering parts, this is a safety
item.
11.Turn steering wheel stop to stop and check for normal
operation and then check to ensure that you're able to turn
the wheel so that the steering linkages under the car hit both
the right and left steering stops without reaching the
internal steering box limits.
12.There should be no need to realign the front end of the car
since no steering geometry was changed.
13.As an ancillary item, check the tightness of the steering
box to chassis bolts. Also check for any sheet metal cracks
where the steering box attaches to the body.